Knitting Tutorial • Weaving in ends (on double sided garter stitch) • [finishing]
Estimated reading time: 3 minutes![]()
Have you ever wondered what’s the right way to weave in your ends on garter stitch? There are so many options, and many of them leave noticeable ‘glitches’ in your work…
In my opinion this is the best and least noticeable way!
This Video Tutorial is specifically for:
- use on items made from double sided garter stitch (ie. they do not have a right and wrong side): Great for things like dishcloths, towels, sometimes even blankets and throws. Things where the front and back sides are used interchangeably.
*For items made in reverse stocking-stitch or garter stitch items which have a back side (ie. clothing, single sided blankets, etc. where you can weave the end in on the back side). Check out my other finishing video for Weave in ends (on stocking-stitch or back side of garter stitch)
The Essence of this finishing technique:
- You are essentially following the underlying stitch.
- This technique crosses from the back side to the front side following a single stitch
- This way of weaving in you tail ends blends seamlessly into most garter stitch work. If you do it right you should need to look very carefully just to see where the tail end was.
Video:
see the video below for a demo showing how to weave in the ends in this way (knitting tutorial weave ends the right way!):
I I
I I
V V
Please subscribe to my youtube channel! 🙂
Steps for how to weave in ends on double sided garter stitch without the video:
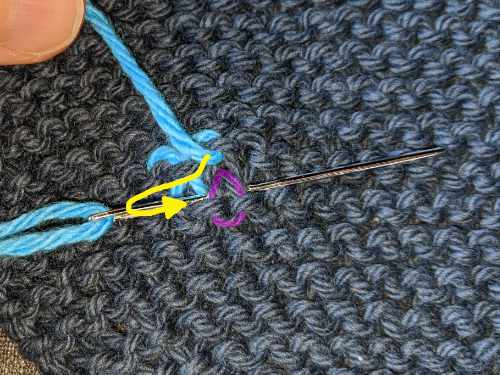
- First Identify the ‘bumps’ (the part of the stitch that looks like a rainbow), and the ‘valleys’ (the part of the stitch that looks like a smile).
- Follow a ‘bump’, over to the right until you can see the ‘valley’ just below and off to the side… go down through the valley.
- now directly under that ‘valley’ stitch you just came down through you will see two teardrop loops. You need to go under the lower loop from the left to the right (shown in the image highlighted purple).
- Next you are going to go back up through the ‘valley’ stitch you came down through in step 2.
*continue steps 2-4 until you have woven your tail in at least 5 full repeats (you can always do more for extra security).
That’s all there is to it! Now you know how to weave in ends :).
